|
|
Post by Admin on Jun 8, 2014 16:35:34 GMT
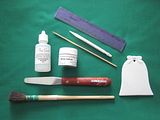
Christmas Bells with White VelvetI have admired Neva Nelson's examples using her White Velvet for some time and decided to give it a try. I could easily see this technique done on Christmas ornaments so decided to choose a flat ornament and play. Materials Used: porcelain ornaments Neva's White Velvet Water Based Medium by Fay Good Water Palatte Knife knitting needle and skewer for etching Mop Brush 1/2" Flat Shader small ruler for marking lines Mother of Pearl Luster Enamel 
|
|
|
|
Post by Admin on Jun 8, 2014 16:36:11 GMT
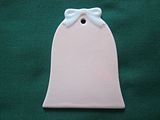
*Neva suggests wearing a dust mask in mixing the White Velvet. Place some of the powdered White Velvet onto a glazed tile and add the water-based medium a little at a time. Mix to a loose consistency. *Once mixed, you can remove your mask. You will need to thin the White Velvet mixture with water by adding just a drop or two at a time until the white Velvet reaches a pale pink color and is the consistency of a medium cream. You can test the mixture with a palette knife. Scoop up some White Velvet and if it slowly drips off the edge of the knife, it is ready to work with. I used a square shader to apply the White Velvet, keeping the mixture even I made sure to cover the porcelain with a thin coat. For my bells, I simply painted the White Velvet over the entire surface, leaving the bow at the top of the bell clean. It is important to work quickly as the White Velvet dries quickly. You can also add a drop or two of water as needed. Neva also gives instructions on pouncing the White Velvet onto your surface using a silk-wrapped sponge. The White Velvet will need to dry completely. You can help this along with the use of a hair dryer. I just allowed my ornaments to dry while I worked on other things. When the White Velvet is completely dry, it will be a light pink color.  |
|
|
|
Post by Admin on Jun 8, 2014 16:37:49 GMT
Photo after firing bell ornament. The pink color is now white:  *Neva suggests wearing a dust mask in mixing the White Velvet. Place some of the powdered White Velvet onto a glazed tile and add the water-based medium a little at a time. Mix to a loose consistency. *Once mixed, you can remove your mask. You will need to thin the White Velvet mixture with water by adding just a drop or two at a time until the white Velvet reaches a pale pink color and is the consistency of a medium cream. You can test the mixture with a palette knife. Scoop up some White Velvet and if it slowly drips off the edge of the knife, it is ready to work with. I used a square shader to apply the White Velvet, keeping the mixture even I made sure to cover the porcelain with a thin coat. For my bells, I simply painted the White Velvet over the entire surface, leaving the bow at the top of the bell clean. It is important to work quickly as the White Velvet dries quickly. You can also add a drop or two of water as needed. Neva also gives instructions on pouncing the White Velvet onto your surface using a silk-wrapped sponge. The White Velvet will need to dry completely. You can help this along with the use of a hair dryer. I just allowed my ornaments to dry while I worked on other things. When the White Velvet is completely dry, it will be a light pink color.  |
|
|
|
Post by Admin on Jun 8, 2014 16:38:32 GMT
|
|
|
|
Post by Admin on Jun 8, 2014 16:39:13 GMT
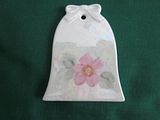
There really is so much you can do to decorate the back of the ornaments! I decided to use my Mother of Pearl luster and then paint a wild rose with metallic paints. I used Karla Pendleton's frosty Sea Foam to paint my leaves and Frosty Pink to paint by wild rose. I discovered that I needed two fires to deepen the colors. Here are the results:  |
|
|
|
Post by Admin on Jun 8, 2014 16:39:47 GMT
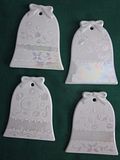
I wanted to add just a touch of enameling to my Christmas Bells. I used Celee's Nameling and mixing medium and her Nameler brush. It is important to get just the right consistency so that your enamel will shine and have a plump look. This took just a bit of practice to discover - please keep in mind that this was my first experience with enamel  I fired my ornaments in my jewelry kiln with the door cracked for 5 minutes then shut for 15 minutes. I left the ornaments in the kiln until they were completely cool. The ornaments that did the best were two that were the last to go into the kiln. I think that the enameling seemed to do best if it set for a bit before firing.   I have to also add that I purchased Celee's Nameling quite some time ago and this is my first experience in using it in my painting. I have to thank Art Chat for giving me the opportunity to experiment and grow as I learn here. This was really fun! And I know I will be using enameling for touches in my future painting, too! |
|